|
Introduction
Have you found yourself restoring or repairing a game and you encounter the
problem where a fuse in the game keeps blowing? Well, this page is
about creating a fuse "breaker" so that you don't have to keep replacing
blown fuses as you troubleshoot the game and don't quite solve the problem
the first time you attempt to fix it. You use the steps I show below
to solder a miniature "breaker" to a fuse. When you plug the fuse breaker
into the fuse holder and then fire up the game to test your repairs, instead
of the fuse blowing again, the breaker "blows" which is easy to reset by
just pushing a button in. If the breaker blows, just turn off the game,
reset the breaker, and try a different repair to stop the breaker from
blowing. This can save you some money if the problem is a little more
difficult to find than you first expected.
Fuse Breaker Values
Some folks might
only use a miniature breaker that is lower amperage, but I make fuse
breakers that are 1/2A, 1A, 2A, 2.5A, 4A, 5A, 6A, 8A, 10A, and 20A. I also
make several of each amperage rating. Primarily the 2A, 4A, 8A, and 10A
fuse breakers. The pictures below involve a 2.5A, 4A, and 5A
breaker.
When To Use A Fuse Breaker
If I find
a game that has a blown fuse I just replace it and see if the problem is
fixed. But, if I turn the game on when first checking voltages and I see a
fuse blow (a flash will occur or it will glow red and then blow), I go
straight for the fuse breaker. No sense in wasting a good fuse when I
already know what will happen. If I find that lights suddenly quit working
when turning a game on that used to work, I find the fuse that blew and
replace it with a fuse breaker and begin troubleshooting. So these are the
cases where I would use a fuse breaker.
How To Make The Fuse Breaker
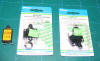
First, you need to buy the miniature breakers. I
bought mine at a local electronics store in Boulder, Colorado where they
sometimes sell breakers that have been pulled from existing equipment.
This means they are pretty cheap, although they aren't brand new. In the
first picture below you will see a "used" breaker and two new ones that
are still packaged. Although they have a price sticker that shows $3.95,
they were marked down to $2.95. I typically buy the used ones since they
can be quite cheap, but this time around all they had in the 4A and 5A
breakers were new parts.
Second, you need a fuse to solder the breaker to in
order to create your fuse breaker. In the past I would use a blown fuse
that I had saved just for this purpose, but I learned something along the
way. When a fuse is blown, the wire filament in the center of the fuse is
separated. Why is this a big deal? Because when you apply solder to
the end of the fuse metal caps they can easily slide off when heated with
the soldering iron. The metal expands due to the heat and you run in to a
bit of a problem when applying the solder because the metal end will
rotate freely. This means that as you try to apply solder the end metal
cap is moving around. You don't want this to happen, so the best thing I
found was to use a new fuse that still has the center conductor holding
the two metal end caps together. I found some old fuses in my stockpile
that weren't rated that high (a 1/4 Amp) but had different innards than a
standard slow blow fuse. It made applying solder to the end metal caps
easier as well as soldering the breaker to the fuse metal end caps.
Once I applied some solder to the fuse metal end caps, I bent the used
breaker's "legs" outwards so that they could be soldered to
the metal end caps. The other breakers had straight lugs which couldn't be
bent outwards, but would still be able to be soldered to the metal end
caps securely. Then with my vise holding one end of the fuse, I soldered
the first lug to the metal end cap on the fuse being sure that the other
lug could also be soldered to its metal end cap. I heated both the lug and
the metal end cap well enough that the solder could flow and create a
secure electrical connection. These breakers were rock solid when I
finished soldering them.
But wait a minute, didn't I use a good fuse when making
the fuse breaker? What happens when I plug the fuse breaker in to the fuse
holder and current begins flowing? Since I used good fuses that were
rated much lower than the breakers, the inner fuse filament will simply
blow and the breaker will still control the amount of current that flows
in the circuit. Once the fuse blows the inner filament, it's the same as a
blown fuse. The only reason for using the good fuse was to control the
ability to solder the breaker on to the fuse a lot easier. The breaker
will still function as it should and will limit the current based on its
rating. If using a 4 amp fuse breaker, and if the current rises above 4
amps, the breaker will "blow" and the button will punch outwards. All you
have to do to reset it is to push the button back in and you will feel a
little click when it resets.
If your game is blowing a fuse and you've made a fuse
breaker as I've suggested above, you can test your new fuse breaker by
turning off the game, replace the blown fuse with your new fuse breaker,
turn the game back on and do whatever it took to blow the fuse, and the
inner filament will blow and then the breaker will also blow. Turn the
game off and reset the breaker, then fix the problem you think is causing
the fuse to blow and turn the game back on and see if it is still blowing
the breaker. If it continues to blow the breaker, you still haven't fixed
the problem. Note that after this first time of testing it your new fuse
breaker will be nothing more than a miniature breaker mounted to a blown
fuse. All the current will go through the breaker from then on.
Another Way To Make A Fuse Breaker
Another thing you can do is to solder a lead to each end of the miniature
breaker lugs and solder an alligator clip to the end of each lead. This
way you can attach the breaker to the fuse holder using alligator clips. I
usually don't bother with this since I've found that my fuse breakers simply plug
in to the fuse holder. Where you might want to use the leads with
alligator clips is a case where you have a broken fuse holder and you plan
to fix that later. In the meantime you could use the alligator clips to
connect to each end of the fuse holder that will need to be replaced. Just
watch out that your breaker doesn't rest or fall over on another part of
the circuit since a lot of times where you find one fuse, you'll find
others. Another reason to solder leads with alligator clips to a breaker
is where you have an "inline" fuse holder. In that case you would open the
inline fuse holder and push the wires through so that you could attach
the fuse breaker alligator clips to each wire end.
Fuse Breaker Pictures
 |
 |
Here are three miniature
breakers.
|
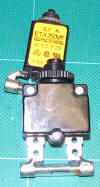
A fuse that is soldered on
both ends.
Note that
I use an older fuse that is still good
but has a low amp rating.
|
 |
|
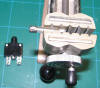
These are two fuse
"breakers" that I made.
It took maybe 5 minutes total to make these.
You could also solder leads to the circuit breaker
lugs
with alligator clips
attached to the end of the leads
if you don't
want to solder directly to the fuse.
|
|
Thanks go to my pinhead buddy Ryan who first turned me on
to this idea of using fuse breakers and saving fuses that continue to blow due to not quite having
the problem fixed. The idea of using a good small amperage fuse to solder
the breaker to is my idea.
|
All
Graphics & Text © Steve Corley |
|
The
pictures you see were created by Steve Corley unless otherwise
noted.
Unauthorized use is strictly prohibited |
|